tensorflow2/kerasでcustom Convolutional LSTMを組み立てる
はじめに
時系列データを扱うNNとしてRNN(特にLSTM)が使用されています.
RNNは,その"reccurent"な構造により現時刻だけではなく前の時刻の情報を加味して推論できます.
ここで,時系列データとは,音声やテキストなど前後情報の並びに意味を持つデータです.
そして,画像+時間である動画などには,convolutional RNN(LSTM)が使用されます.
一般的にはconvolutional LSTM(convLSTM)*1がよく使用されており,
この内容については下記の資料がわかりやすいです.
www.slideshare.net
本記事ではtensorflow2/kerasを使ってカスタムconv LSTMレイヤーを作成することを目標とします.
本記事の構成
そもそもLSTM自体のカスタムについて,下記記事をとても参考にさせていただきました.
これを読んでから本記事を読むとわかりやすいかもしれません.
qiita.com
本記事も似たように構成されています.
環境
Windows10
CUDA Toolkit 10.1 update2
cuDNN v7.6.5 (November 5th, 2019), for CUDA 10.1
Python 3.6.6 (anaconda3)
tensorflow 2.3.0
keras 2.4.3
オリジナルのconvLSTMを見てみる
下のような感じでConvLSTM2Dを呼び出すだけで使えますよね.
ここでは各フレーム (256,256,3) の動画を入力して同じフレーム長の特徴量を出力するようにしています.(return_sequences=True)
from tensorflow.keras.layers import Input, ConvLSTM2D
from tensorflow.keras.models import Model

inputs = Input((None, 256, 256, 3))
x = ConvLSTM2D(filters=64, kernel_size=3, padding='same', return_sequences=True)(inputs)
model = Model(inputs=inputs, outputs=x)
model.summary()
# _________________________________________________________________
# Layer (type)                 Output Shape              Param #
# =================================================================
# input_6 (InputLayer)         [(None, None, 256, 256, 3 0
# _________________________________________________________________
# conv_lst_m2d_4 (ConvLSTM2D)  (None, None, 256, 256, 64 154624
# =================================================================
# Total params: 154,624
# Trainable params: 154,624
# Non-trainable params: 0
# _________________________________________________________________
これをConvRNN2Dを用いて書き換えてみましょう.
オリジナルのconvLSTMをConvRNN2Dを使って書き換えてみる
ConvRNN2Dはセルを渡すとそれをrecurrentにしてくれるものです.
セルを自分で定義してConvRNN2D() で囲むことで好きな構造のRNNを定義できます.
下記リンクはConvRNN2DではなくRNNですが...働き的にはほぼ同じです.
https://www.tensorflow.org/guide/keras/rnn
しかし,ConvRNN2Dはそのままimportできません;;
ソースを見るとわかりますが@keras_exportでデコレータされてないんですね~
from tensorflow.keras.layers import ConvRNN2D
# ---------------------------------------------------------------------------
# ImportError                               Traceback (most recent call last)
# <ipython-input-11-ca860ffdc375> in <module>()
# ----> 1 from tensorflow.keras.layers import ConvRNN2D
# ImportError: cannot import name 'ConvRNN2D'
# ---------------------------------------------------------------------------
なのでソースを引っ張ってきて無理やり呼び出します.
!wget https://raw.githubusercontent.com/tensorflow/tensorflow/v2.3.0/tensorflow/python/keras/layers/convolutional_recurrent.py
from tensorflow.keras.layers import Input
from tensorflow.keras.models import Model
from convolutional_recurrent import ConvRNN2D, ConvLSTM2DCell

inputs = Input((None, 256, 256, 3))
# x = ConvLSTM2D(filters=64, kernel_size=3, padding='same', return_sequences=True)(inputs)
x = ConvRNN2D(ConvLSTM2DCell(filters=64, kernel_size=3, padding='same'), return_sequences=True)(inputs)
model = Model(inputs=inputs, outputs=x)
model.summary()
# _________________________________________________________________
# Layer (type)                 Output Shape              Param #
# =================================================================
# input_2 (InputLayer)         [(None, None, 256, 256, 3 0
# _________________________________________________________________
# conv_rn_n2d (ConvRNN2D)      (None, None, 256, 256, 64 154624
# =================================================================
# Total params: 154,624
# Trainable params: 154,624
# Non-trainable params: 0
# _________________________________________________________________
ConvLSTM2DをConvRNN2DとConvLSTM2DCellに分離して書けることがわかりました.
これで,ConvLSTM2DCellをいじることで好きなConvLSTMを作れます.
ConvLSTM2DCellを見てみる
実装を見る前にconvLSTMの処理を確認しておきます.
kerasではヒープホールは実装されていないので,ここでは触れません.
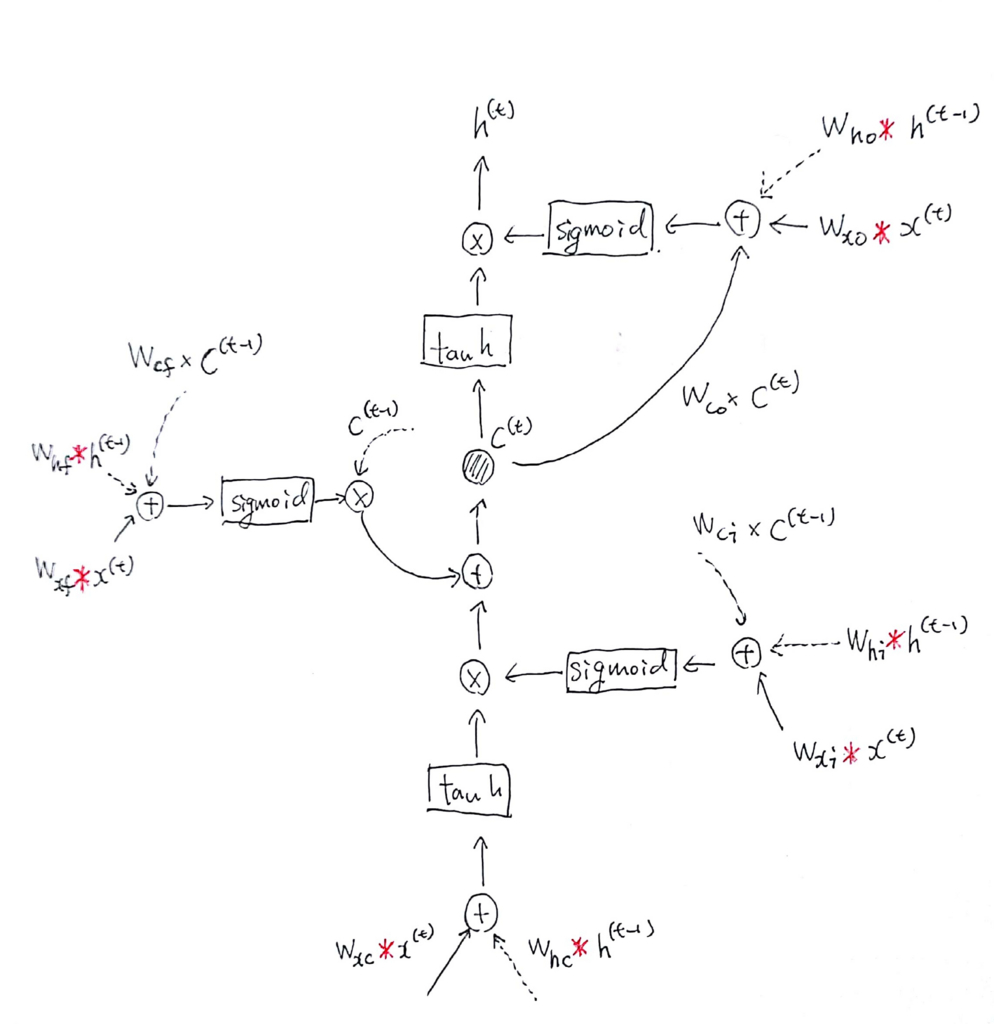
http://joisino.hatenablog.com/entry/2017/10/27/200000 より見やすい構造図をお借りしました.
ヒープホールを除いた部分を式で表すとこんな感じ.
入力と前時刻の状態に畳み込みを適用していることがわかります.
ConvLSTM2DCellの解読
上の式を踏まえて実装を見てみます.
tensorflow/convolutional_recurrent.py
build()で重みを定義しています.
def build(self, input_shape):

  if self.data_format == 'channels_first':
    channel_axis = 1
  else:
    channel_axis = -1
  if input_shape[channel_axis] is None:
    raise ValueError('The channel dimension of the inputs '
                      'should be defined. Found `None`.')
  input_dim = input_shape[channel_axis]
  kernel_shape = self.kernel_size + (input_dim, self.filters * 4)
  self.kernel_shape = kernel_shape
  recurrent_kernel_shape = self.kernel_size + (self.filters, self.filters * 4)

  self.kernel = self.add_weight(shape=kernel_shape,
                                initializer=self.kernel_initializer,
                                name='kernel',
                                regularizer=self.kernel_regularizer,
                                constraint=self.kernel_constraint)
  self.recurrent_kernel = self.add_weight(
      shape=recurrent_kernel_shape,
      initializer=self.recurrent_initializer,
      name='recurrent_kernel',
      regularizer=self.recurrent_regularizer,
      constraint=self.recurrent_constraint)

  if self.use_bias:
    if self.unit_forget_bias:

      def bias_initializer(_, *args, **kwargs):
        return K.concatenate([
            self.bias_initializer((self.filters,), *args, **kwargs),
            initializers.get('ones')((self.filters,), *args, **kwargs),
            self.bias_initializer((self.filters * 2,), *args, **kwargs),
        ])
    else:
      bias_initializer = self.bias_initializer
    self.bias = self.add_weight(
        shape=(self.filters * 4,),
        name='bias',
        initializer=bias_initializer,
        regularizer=self.bias_regularizer,
        constraint=self.bias_constraint)
  else:
    self.bias = None
  self.built = True
self.add_weightに注目してみると,
入力に適用される重みが
self.kernelに,
前の状態に適用される重みが
self.recurrent_kernel,
バイアスが
self.biasに格納されていることがわかります.
上記のように,各4種類の重みが連結されたものがまとめて入っています.
そのため下記のようにフィルター数が4倍に設定されています.
kernel_shape = self.kernel_size + (input_dim, self.filters * 4)
self.kernel = self.add_weight(shape=kernel_shape,
...
call()がconvLSTMの本体部分です.
dropout関係のコードは省略しています.
コメントとして何が行われているのかを追記しています.
def call(self, inputs, states, training=None):
  # 前の状態を受け取る.h->前の隠れ状態,c->前のセル状態
  h_tm1 = states[0]  # previous memory state
  c_tm1 = states[1]  # previous carry state

  # (略)

  # カーネル・バイアスをを4つに分けておく
  (kernel_i, kernel_f,
    kernel_c, kernel_o) = array_ops.split(self.kernel, 4, axis=3)
  (recurrent_kernel_i,
    recurrent_kernel_f,
    recurrent_kernel_c,
    recurrent_kernel_o) = array_ops.split(self.recurrent_kernel, 4, axis=3)

  if self.use_bias:
    bias_i, bias_f, bias_c, bias_o = array_ops.split(self.bias, 4)
  else:
    bias_i, bias_f, bias_c, bias_o = None, None, None, None

  # 上式中の畳み込み部分を先に処理する
  x_i = self.input_conv(inputs_i, kernel_i, bias_i, padding=self.padding)
  x_f = self.input_conv(inputs_f, kernel_f, bias_f, padding=self.padding)
  x_c = self.input_conv(inputs_c, kernel_c, bias_c, padding=self.padding)
  x_o = self.input_conv(inputs_o, kernel_o, bias_o, padding=self.padding)
  h_i = self.recurrent_conv(h_tm1_i, recurrent_kernel_i)
  h_f = self.recurrent_conv(h_tm1_f, recurrent_kernel_f)
  h_c = self.recurrent_conv(h_tm1_c, recurrent_kernel_c)
  h_o = self.recurrent_conv(h_tm1_o, recurrent_kernel_o)

  # 上式の計算を行い,h,cを更新する
  i = self.recurrent_activation(x_i + h_i)
  f = self.recurrent_activation(x_f + h_f)
  c = f * c_tm1 + i * self.activation(x_c + h_c)
  o = self.recurrent_activation(x_o + h_o)
  h = o * self.activation(c)
  # hを出力,[h,c]を次の時刻のセルに渡す
  return h, [h, c]

def input_conv(self, x, w, b=None, padding='valid'):
  conv_out = K.conv2d(x, w, strides=self.strides,
                      padding=padding,
                      data_format=self.data_format,
                      dilation_rate=self.dilation_rate)
  if b is not None:
    conv_out = K.bias_add(conv_out, b,
                          data_format=self.data_format)
  return conv_out

def recurrent_conv(self, x, w):
  conv_out = K.conv2d(x, w, strides=(1, 1),
                      padding='same',
                      data_format=self.data_format)
  return conv_out
return h, [h, c]部分を見てcall()は現時刻で出力するものと,次時刻に渡す状態を返していることがわかります.
ここをいじると自分で好きな構造のNNを作れそうです.
自分でカスタムconvLSTMを組み立てる
論文などで提案されている改良されたconvLSTMなどを自分で実装してみたいときの流れを紹介します.
今回対象とするconvLSTMの紹介
ここでは,[Zhang 2019]のCLSTM*2を構築したいと思います.


著者のpytorch実装も公開されているのでまだやりやすいですね.
ST-CLSTM/R_CLSTM_modules_2.py at master · hkzhang91/ST-CLSTM · GitHub
(論文の式と実装を見るとどことなく話が違う部分があるんですが)
(特にDは存在しなく,RがDの役割も担っています)
実装を元にこんな感じだな~と把握した構造が下図です.

実際に出力する値と次時刻のセルに渡す値が異なる点がポイントです.
出力する値は1チャンネルですが,引き継ぐ値は8チャンネルです.
そして,入力されるチャンネル数Cと合わせて,セル内ではC+8チャンネルのデータが処理されます.
なお,図中のRはCNNで,下図の構造をしています.

これを実装していきましょう.
実装だけみたい人は下記githubにあるので見てみてください.
github.com
状態はどれ?
今回のconvLSTMで前の時刻の情報を使っている部分はです.
はforget gateの変数と被ってしまうので便宜上
と表します.
重みはどれ?
式を見ると入力と前の状態をconcatしてから畳み込みをしていますが,ここでは従来どおり別々に畳み込みを行います.
重みとして定義するものは,
入力に適用される重み,前の状態に適用される重み
,バイアス
.
に加えて,R内の4つの畳み込みの重みです.
実装してみる
RefineNetの構築
まずはRを別のCNNRefineNetとして定義しておきます.
ここは特にLSTMとかは何も関係ないです.
class RefineNet(Layer):
    def __init__(self, hidden_states_chs=8):
        super(RefineNet, self).__init__()
        self.hidden_states_chs = hidden_states_chs
        self.kernel_initializer = 'glorot_uniform'
        self.kernel_regularizer = None
        self.kernel_constraint = None
        self.bias_initializer = 'zeros'
        self.bias_regularizer = None
        self.bias_constraint = None

    def build(self, input_shape):
        input_chs = input_shape[-1]    # CLSTM's input_chs + hidden_states_chs
        self.bn1 = BatchNormalization()
        self.bn2 = BatchNormalization()
        self.refine_1_kernel = self.add_weight(name='refine_1_kernel',
                        shape=(5, 5,
                                input_chs,
                                input_chs),
                        initializer=self.kernel_initializer,
                        regularizer=self.kernel_regularizer,
                        constraint=self.kernel_constraint)
        self.refine_2_kernel = self.add_weight(name='refine_2_kernel',
                        shape=(5, 5,
                                input_chs,
                                input_chs),
                        initializer=self.kernel_initializer,
                        regularizer=self.kernel_regularizer,
                        constraint=self.kernel_constraint)
        self.refine_h_kernel = self.add_weight(name='refine_h_kernel',
                        shape=(3, 3,
                                input_chs,
                                self.hidden_states_chs),
                        initializer=self.kernel_initializer,
                        regularizer=self.kernel_regularizer,
                        constraint=self.kernel_constraint)
        self.refine_d_kernel = self.add_weight(name='refine_d_kernel',
                        shape=(5, 5,
                                input_chs,
                                1),
                        initializer=self.kernel_initializer,
                        regularizer=self.kernel_regularizer,
                        constraint=self.kernel_constraint)
        self.refine_1_bias = None
        self.refine_2_bias = None
        self.refine_h_bias = self.add_weight(name='refine_h_bias',
                        shape=(self.hidden_states_chs,),
                        initializer=self.bias_initializer,
                        regularizer=self.bias_regularizer,
                        constraint=self.bias_constraint)
        self.refine_d_bias = self.add_weight(name='refine_d_bias',
                        shape=(1,),
                        initializer=self.bias_initializer,
                        regularizer=self.bias_regularizer,
                        constraint=self.bias_constraint)
        super(RefineNet, self).build(input_shape)

    def call(self, inputs):
        r_1 = self._conv(inputs, self.refine_1_kernel, self.refine_1_bias, padding='same')
        r_1 = self._BN_relu(r_1, self.bn1)
        r_2 = self._conv(r_1,    self.refine_2_kernel, self.refine_2_bias, padding='same')
        r_2 = self._BN_relu(r_2, self.bn2)
        r_h = self._conv(r_2,    self.refine_h_kernel, self.refine_h_bias, padding='same')
        r_d = self._conv(r_2,    self.refine_d_kernel, self.refine_d_bias, padding='same')
        return r_h, r_d

    def _conv(self, x, w, b=None, padding='same'):
        conv_out = K.conv2d(x, w, strides=(1, 1),
                                padding=padding,
                                data_format='channels_last')
        if b is not None:
            conv_out = K.bias_add(conv_out, b,
                                data_format='channels_last')
        return conv_out

    def _BN_relu(self, x, BN):
        x = BN(x)
        x = K.relu(x)
        return x

    def get_config(self):
        base_config = super(RefineNet, self).get_config()
        out_config = {
            **base_config,
            "hidden_states_chs": self.hidden_states_chs,
            "kernel_initializer": self.kernel_initializer,
            "kernel_regularizer": self.kernel_regularizer,
            "kernel_constraint": self.kernel_constraint,
            "bias_initializer": self.bias_initializer,
            "bias_regularizer": self.bias_regularizer,
            "bias_constraint": self.bias_constraint,
        }
        return out_config
convLSTMの重みを定義
次に本題のカスタムconvLSTMを実装します.
まず重み定義部分のbuild()です.
  def build(self, input_shape):

    if self.data_format == 'channels_first':
      channel_axis = 1
    else:
      channel_axis = -1
    if input_shape[channel_axis] is None:
      raise ValueError('The channel dimension of the inputs '
                       'should be defined. Found `None`.')
    self.input_dim = input_shape[channel_axis]
    kernel_shape = self.kernel_size + (self.input_dim, self.filters * 3 + self.input_dim)
    self.kernel_shape = kernel_shape
    recurrent_kernel_shape = self.kernel_size + (self.filters, self.filters * 3 + self.input_dim)

    self.kernel = self.add_weight(shape=kernel_shape,
                                  initializer=self.kernel_initializer,
                                  name='kernel',
                                  regularizer=self.kernel_regularizer,
                                  constraint=self.kernel_constraint)
    self.recurrent_kernel = self.add_weight(
        shape=recurrent_kernel_shape,
        initializer=self.recurrent_initializer,
        name='recurrent_kernel',
        regularizer=self.recurrent_regularizer,
        constraint=self.recurrent_constraint)

    if self.use_bias:
      if self.unit_forget_bias:

        def bias_initializer(_, *args, **kwargs):
          return K.concatenate([
              self.bias_initializer((self.filters,), *args, **kwargs),
              initializers.get('ones')((self.filters,), *args, **kwargs),
              self.bias_initializer((self.filters,), *args, **kwargs),
              self.bias_initializer((self.input_dim,), *args, **kwargs),
          ])
      else:
        bias_initializer = self.bias_initializer
      self.bias = self.add_weight(
          shape=(self.filters * 3 + self.input_dim,),
          name='bias',
          initializer=bias_initializer,
          regularizer=self.bias_regularizer,
          constraint=self.bias_constraint)
    else:
      self.bias = None

    self.refine_net = RefineNet(hidden_states_chs=self.filters)
    self.built = True
上図の構造を見るとわかりますが,このconvLSTMではi,f,cは8チャンネル出力,oは入力チャンネルCを出力します.
そのため,kernel及びreccurent kernel,biasの形状は下記のように設定されています.
kernel_shape = self.kernel_size + (self.input_dim, self.filters * 3 + self.input_dim)
recurrent_kernel_shape = self.kernel_size + (self.filters, self.filters * 3 + self.input_dim)
self.bias = self.add_weight(
          shape=(self.filters * 3 + self.input_dim,)
          ...
また,先程定義したCNNRefineNetをここで宣言しておきます.
convLSTMの処理部分を実装
オリジナルのconvLSTMと同じように,カーネルを分割し,処理どおりに計算していきます.
def call(self, inputs, states, training=None):
  h_tm1 = states[0]  # previous memory state
  c_tm1 = states[1]  # previous carry state

  # (略)

  (kernel_i, kernel_f,
    kernel_c, kernel_o) = array_ops.split(self.kernel, [self.filters,self.filters,self.filters, self.input_dim], axis=3)
  (recurrent_kernel_i,
    recurrent_kernel_f,
    recurrent_kernel_c,
    recurrent_kernel_o) = array_ops.split(self.recurrent_kernel, [self.filters,self.filters,self.filters, self.input_dim], axis=3)

  if self.use_bias:
    bias_i, bias_f, bias_c, bias_o = array_ops.split(self.bias, [self.filters,self.filters,self.filters, self.input_dim])
  else:
    bias_i, bias_f, bias_c, bias_o = None, None, None, None

  x_i = self.input_conv(inputs_i, kernel_i, bias_i, padding=self.padding)
  x_f = self.input_conv(inputs_f, kernel_f, bias_f, padding=self.padding)
  x_c = self.input_conv(inputs_c, kernel_c, bias_c, padding=self.padding)
  x_o = self.input_conv(inputs_o, kernel_o, bias_o, padding=self.padding)
  h_i = self.recurrent_conv(h_tm1_i, recurrent_kernel_i)
  h_f = self.recurrent_conv(h_tm1_f, recurrent_kernel_f)
  h_c = self.recurrent_conv(h_tm1_c, recurrent_kernel_c)
  h_o = self.recurrent_conv(h_tm1_o, recurrent_kernel_o)

  i = self.recurrent_activation(x_i + h_i)
  f = self.recurrent_activation(x_f + h_f)
  c = f * c_tm1 + i * self.activation(x_c + h_c)
  o = self.recurrent_activation(x_o + h_o)
  h = K.concatenate((o, self.activation(c)), -1)
  r_h, r_d = self.refine_net(h)
  return r_d, [r_h, c]
下記がオリジナルのconvLSTMとは明確に異なる点です.
convLSTMのoutputをRに入力し,得られた1チャンネルの出力r_dをセル出力とし,8チャンネルの出力r_hをcとともに次の時刻のセルへ渡します.
h = K.concatenate((o, self.activation(c)), -1)
r_h, r_d = self.refine_net(h)
return r_d, [r_h, c]
実装したセルを使ってcustom convLSTMレイヤーを定義してみる
上でやったようにConvRNN2Dで囲ってやります.
こんな感じ
from tensorflow.keras.layers import Input
from tensorflow.keras.models import Model
from convolutional_recurrent import ConvRNN2D
from STConvLSTM2DCell import STConvLSTM2DCell

inputs = Input((None, 256, 256, 3))
x = ConvRNN2D(STConvLSTM2DCell(8, kernel_size=3, padding='same',
                    activation='tanh', recurrent_activation='hard_sigmoid',
                    kernel_initializer='glorot_uniform', recurrent_initializer='orthogonal'),
            return_sequences=True, name='STConvLSTM2D')(inputs)
model = Model(inputs=inputs, outputs=x)
model.summary()

# _________________________________________________________________
# Layer (type)                 Output Shape              Param #
# =================================================================
# input_2 (InputLayer)         [(None, None, 256, 256, 3 0
# _________________________________________________________________
# STConvLSTM2D (ConvRNN2D)     (None, None, 256, 256, 1) 9914
# =================================================================
# Total params: 9,914
# Trainable params: 9,870
# Non-trainable params: 44
# _________________________________________________________________
セルの内部状態としては8チャンネル情報が循環していますが,出力としては1チャンネルであることが確認できます.
おわりに
この記事がtensorflow2/kerasでカスタムconvRNNを構築する人の助けになれば幸いです!
kerasは用意されたレイヤーを組み合わせるのは簡単なんですが,
レイヤーを自作するのはなかなかしんどいですね...
はやくtf.eagerかpytorchに移行しよう
全体のコードは下記githubに置いています.
興味があれば確認してみてください.
github.com
参考文献
*1:Xingjian Shi, et. al. Convolutional LSTM network: A machine learning approach for precipitation nowcasting. In NIPS, 2015 https://arxiv.org/abs/1506.04214v1
*2:Zhang, Haokui, et al. "Exploiting temporal consistency for real-time video depth estimation." Proceedings of the IEEE International Conference on Computer Vision. 2019. https://openaccess.thecvf.com/content_ICCV_2019/html/Zhang_Exploiting_Temporal_Consistency_for_Real-Time_Video_Depth_Estimation_ICCV_2019_paper.html
opencvのoptical flow計算は入力にuint8またはfloat32型しか取らない
内容はタイトルの通りです.(終)
下記はエラー内容とその解決方法,参考記事のまとめです.
環境
!python -V
# Python 3.6.9
cv2.__version__
# 4.1.2
発生したエラーとサンプルコード
import numpy as np
import cv2
TVL1 = cv2.optflow.DualTVL1OpticalFlow_create()

video = np.random.rand(10,512,512)
print(video.dtype)
# float64

opts = []
for i in range(len(video)-1):
    opts.append(TVL1.calc(video[i],video[i+1],None))
# ---------------------------------------------------------------------------
# error                                     Traceback (most recent call last)
# <ipython-input-3-9bce225d882c> in <module>()
#       1 opts = []
#       2 for i in range(len(video)-1):
# ----> 3     opts.append(TVL1.calc(video[i],video[i+1],None))

# error: OpenCV(4.1.2) /io/opencv_contrib/modules/optflow/src/tvl1flow.cpp:413:
# error: (-215:Assertion failed) I0.type() == CV_8UC1 || I0.type() == CV_32FC1 in function 'calc'
I0.type() == CV_8UC1 || I0.type() == CV_32FC1と怒られている.
解決法
uint8かfloat32に入力を型変換しましょう.
video = np.float32(video) #np.uint8(video)
print(video.dtype)
# float32

opts = []
for i in range(len(video)-1):
    opts.append(TVL1.calc(video[i],video[i+1],None))
参考
動画の各フレームからエッジ検出を行う(keras実装)
今回したこと
動画の各フレームにおいてsobelフィルタを用いたエッジ検出を行いました.
普通に各フレームでcv2.Sobelをしろとの声も聞こえてくるかと思いますが,
なんとなくkerasのconv3Dで実装したかったのでそのようにしました.
その紹介です.
今回は実装したエッジ検出をMoving MNISTデータセットでテストしました.
時間がない人は下記ノートブックを確認してください.
環境
!python -V
# Python 3.6.9
!pip freeze | grep tensorflow
# tensorflow==2.3.0
kerasで各フレームエッジ検出を実装
こちらのpytorch実装を参考にしています.
https://github.com/JunjH/Revisiting_Single_Depth_Estimation/blob/master/sobel.py
参考元のをpytorch -> keras, conv2D -> conv3Dにしただけです.
conv3Dレイヤーをuse_bias=Falseで定義し,sobelフィルタの重みをset_weightsするだけです.
各フレームでx|y方向のエッジ検出を同時に行うためにConv3D(filters=2, kernel_size=(1,3,3), ...となっています.
任意のフレーム長・画像サイズに対応するため,Input(shape=((None, None, None, 1)))です.
出力は各チャネルにx方向のエッジ,y方向のエッジ画像が含まれています.
実装したもの:
from tensorflow.keras.layers import Input, Conv3D
from tensorflow.keras.models import Model
import numpy as np


class Sobel():
    def __init__(self):
        inputs = Input(shape=((None, None, None, 1)))
        x = Conv3D(filters=2, kernel_size=(1,3,3), padding='valid', use_bias=False)(inputs)
        self.edge_conv = Model(inputs=inputs, outputs=x)

        edge_kx = np.array([[1, 0, -1],
                            [2, 0, -2],
                            [1, 0, -1]])
        edge_ky = np.array([[1, 2, 1],
                            [0, 0, 0],
                            [-1, -2, -1]])
        edge_k = np.stack((edge_kx, edge_ky))

        edge_k = np.transpose(edge_k, (1,2,0)).reshape(1, 3, 3, 1, 2)
        self.edge_conv.layers[1].set_weights([edge_k])
        # self.edge_conv.trainable = False
        # self.edge_conv.compile(optimizer="adam", loss="mse")
        # self.edge_conv.summary()
        # _________________________________________________________________
        # Layer (type)                 Output Shape                 Param #
        # =================================================================
        # input_35 (InputLayer)        (None, None, None, None, 1)  0
        # _________________________________________________________________
        # conv3d_38 (Conv3D)           (None, None, None, None, 2)  18
        # =================================================================
        # Total params: 18
        # Trainable params: 0
        # Non-trainable params: 18
        # _________________________________________________________________

    def get_gradient(self, x):
        grad = self.edge_conv.predict(x)
        return grad
使うとき
get_gradient = Sobel().get_gradient
edges = get_gradient(input_data)
Moving MNISTでテストした結果
入力の一部
 出力の一部
出力の一部

全コードはgistから確認してください.
sobel_keras · GitHub
終わりに
今回はkerasを使用してエッジ検出を行いました.
普通にやるよりは早いのかな?速度面はまた比較してみます(多分しないけど).
今回実装した目的は損失関数でエッジ検出を使用するためだったので,次は損失関数の実装に取り掛かります.
blender2.5 build on Ubuntu10.04(amd64) (vmware15)
まとめ
sudo apt-get update && sudo apt-get upgrade
sudo apt-get install cmake build-essential libfreetype6-dev libglew-dev libglu1-mesa-dev libjpeg-dev libpng12-dev libsndfile1-dev libx11-dev libxi-dev libalut-dev libavcodec-dev libavdevice-dev libavformat-dev libavutil-dev libfftw3-dev libjack-dev libmp3lame-dev libopenal-dev libopenexr-dev libopenjpeg-dev libsdl1.2-dev libswscale-dev libtheora-dev libvorbis-dev libx264-dev libspnav-dev libsamplerate-dev python3 python3-dev

mkdir ~/blender
cd ~/blender
wget -P ~/blender https://download.blender.org/durian/blender/Blender_RenderBranch_source.tgz
tar -xzvf Blender_RenderBranch_source.tgz
rm Blender_RenderBranch_source.tgz
mkdir build
cd build
cmake ../render25 -DWITH_INSTALL:BOOL=FALSE

make
ubuntu 10.04 blender build memo
base
- 空のVM作成→ISO読み込みで日本語化適用
- 古いのでリポジトリ変更jp.archive -> old-releases
sudo cp -p /etc/apt/sources.list /etc/apt/sources.list.bak
sudo sed -i -e 's/archive.ubuntu.com/old-releases.ubuntu.com/g' /etc/apt/sources.list
sudo sed -i -e 's/security.ubuntu.com/old-releases.ubuntu.com/g' /etc/apt/sources.list
sudo apt-get update && sudo apt-get upgrade- vmwareをまたいでコピペするために
- cmakeをいれる
sudo apt-get install cmake
- 色々いれる
sudo apt-get update; sudo apt-get install build-essential libfreetype6-dev libglew-dev libglu1-mesa-dev libjpeg-dev libpng12-dev libsndfile1-dev libx11-dev libxi-dev libalut-dev libavcodec-dev libavdevice-dev libavformat-dev libavutil-dev libfftw3-dev libjack-dev libmp3lame-dev libopenal-dev libopenexr-dev libopenjpeg-dev libsdl1.2-dev libswscale-dev libtheora-dev libvorbis-dev libx264-dev libspnav-devhttps://archive.blender.org/wiki/index.php/Dev:2.5/Doc/Building_Blender/Linux/Ubuntu_9.10/Cmake/
- sourceダウンロード&cmake
mkdir ~/blender
wget -P ~/blender https://download.blender.org/durian/blender/Blender_RenderBranch_source.tgz
cd ~/blender
tar -xzvf Blender_RenderBranch_source.tgz
rm Blender_RenderBranch_source.tgz
mkdir build
cd build
cmake ../render25 -DWITH_INSTALL:BOOL=FALSE
- 無事cmakeできた
make- /home/ubuntu/blender/render25/intern/audaspace/SRC/AUD_SRCResampleReader.h:32:24: error: samplerate.h: そのようなファイルやディレクトリはありません
- libsamplerate-devをいれる
sudo apt-get install libsamplerate-devhttps://blenderartists.org/t/blender-2-5-development-updates/435626/3915
make
/home/ubuntu/blender/render25/source/blender/nodes/intern/SHD_nodes/SHD_dynamic.c:31:20: error: Python.h: そのようなファイルやディレクトリはありません
/home/ubuntu/blender/render25/source/blender/nodes/intern/SHD_nodes/SHD_dynamic.c:32:21: error: compile.h: そのようなファイルやディレクトリはありません
/home/ubuntu/blender/render25/source/blender/nodes/intern/SHD_nodes/SHD_dynamic.c:33:18: error: eval.h: そのようなファイルやディレクトリはありません
python(BeautifulSoup)でWEBスクレイピング(making CVPR2020 accepted papers list)
今回したこと
BeautifulSoupを使ってCVPR2020 Scheduleから[1st author, paper title]形式のcsvリストを作成した.
今回の作業notebook(google colab)
参考サイト
10分で理解する Beautiful Soup - Qiita
【Python】BeautifulSoupを使ってテーブルをスクレイピング - Qiita
基本的に今回書いたコードは上記2サイトから流用している.
要件
1st author, paper titleのみをまとめたリストが欲しい.
あんまり難しいことをしたくないのでpythonで適当にやりたい.
色々作業をする前に事前準備
import requests
from bs4 import BeautifulSoup

# スクレイピング対象の URL にリクエストを送り HTML を取得する
res = requests.get('http://cvpr2020.thecvf.com/program/main-conference')
# レスポンスの HTML から BeautifulSoup オブジェクトを作る
soup = BeautifulSoup(res.text, 'html.parser')
title_text = soup.find('title').get_text()
print(title_text)
#Main Conference | CVPR2020
CVPR2020 Scheduleの構成

class="table table-bordered"テーブルに
<tr class="blue-bottom">
<th>Poster #</th>
<th>Video Time 1</th>
<th>Video Time 2</th>
<th>Paper Title</th>
<th>Author(s)</th>
<th>Paper ID</th>
</tr>
こういう感じで入っているのがわかる.
ので下の感じで取得してみる.
"class":"table table-bordered"を指定してtrタグ内のthタグの要素を取得する.HTMLソースのまんま.
table = soup.findAll("table", {"class":"table table-bordered"})[0]
rows = table.findAll("tr")

# column番号で表示
for row in rows[:3]:
    for col_n, cell in enumerate(row.findAll('td')):
        print(col_n, cell.get_text())
出力はこんな感じ.ここから目的のデータのみを取ればいい.
ここで目的のデータはcolumnの番号だと3, 4のこと.
0 1
1 10:00
2 22:00
3 Unsupervised Learning of Probably Symmetric Deformable 3D Objects From Images in the Wild
4 Shangzhe Wu, Christian Rupprecht, Andrea Vedaldi
5 7
0 2
1 10:05
2 22:05
3 Footprints and Free Space From a Single Color Image
4 Jamie Watson, Michael Firman, Aron Monszpart, Gabriel J. Brostow
5 2582
メインスクリプト
↑の確認で1行ごとに配列index[3,4]を取ればいいことがわかったので,そんな感じで書く.
あとauthorsから1st authorだけを取り出したいので,.split(',')[0]を使用.
import csv

tables = soup.findAll("table", {"class":"table table-bordered"})
with open("cvpr2020.csv", "w", encoding='utf-8') as file:
    writer = csv.writer(file)
    for table in tables:
        for row in table.findAll("tr"):
            cells = [cell.get_text() for cell in row.findAll('td')]
            if len(cells) != 0:
                paper_title = cells[3]
                first_author = cells[4].split(',')[0]
                # print(first_author, ',', paper_title)
                writer.writerow([first_author, paper_title])
これでcsvファイルが出力されるので,下記コードで保存.(google colabを使用したので)
from google.colab import files
files.download('cvpr2020.csv')
終わりに
WEBスクレイピングは今までしたことがなかったが,pythonでBeautifulSoupを使用するとHTMLソースから直感的にデータを抽出することができた.
カンファレンスごとにスケジュールの表記は異なると思うが,同じような流れでスクレイピングは可能であると思う.
mastodon(on docker)でユーザの追加と削除
最近更新をサボってました.
今回は,学内NLP講義に際してmastodonユーザ登録関係で取り組んだ内容をまとめます.
あとなんか恥ずかしかったのでブログタイトルを変えました.
前提
mastodonが動作している.
構築はdocker上.(ここは自分はしていません)
最新バージョンではないです.(v2.5.2)
最新だとtootctlを使ってなんとかするみたい.
Mastodon 保守メモ - Qiita
本題
ユーザ追加
docker-compose run --rm web bundle exec rake mastodon:add_user
# コンテナを作成してコマンド実行(実行後コンテナを削除
docker-compose run --rm ${service_name} ${command}
メール認証
docker-compose run --rm web bundle exec rake mastodon:confirm_email USER_EMAIL=[mail_addr]
ユーザ削除
データベースに入り込んで削除する
# データベースコンテナに入る
docker exec -it `docker ps | grep mastodon_db | awk '{print $1}'` /bin/sh
# 起動中のコンテナでコマンド実行
docker-compose exec ${service_name} ${command}
データベースからユーザとアカウントを削除する
# データベースに入る
psql -U postgres
# 確認
SELECT id, email FROM users;
# 削除
DELETE FROM users WHERE ***;
DELETE FROM accounts WHERE ***;
VGGにおける前処理をネットワーク内で行い自作generatorを高速化する(keras)
今回したこと
VGG16をfinetuneする際に自作generatorがボトルネックになっており,時間がかかっていた.
そこで自作generatorの実装を見直すことで 770s/epoch -> 490s/epoch へと学習自体の高速化を図った.
なお,今回用いたVGG16はkeras標準のものではなく,自分でcaffeモデルから変換したものです.(下記事参照
catdance124.hatenablog.jp
keras.applicationのVGG16はすでにBGR -> RGBへと入力が補正されているらしいので注意.
KerasにおけるVGG16の重みは、Oxford大学のVGGによりCreative Commons Attribution Licenseの下で公開されたものを移植しています。そのため、本来、期待する前処理は、BGR順で0~255の値からImageNetのmeanを引いた値となります。ただし、CaffeModelからKerasModelへの変換の過程でRGB順への補正は行われているようですので、RGB順で0~255がKerasとして期待する入力となります。
今回示すコードのまとめは下記colabに載せてあります.
https://colab.research.google.com/drive/1g_W05-9wSzbU5y-M3pDxkGhfGiH77FR4
ネットワーク内でVGG前処理を行う方法
Lambdaで自作レイヤーを作成する.
vgg_preprocess()が前処理を行う関数
import numpy as np
from keras.models import Model
from keras.layers import Input, Lambda, Dense, Flatten

vgg_mean = np.array([123.68, 116.779, 103.939]).reshape((1,1,1,3))
def vgg_preprocess(x):
    x = x - vgg_mean     # subtract mean
    return x[:, :, :, ::-1]    # bgr->rgb


inputs = Input(shape=(224, 224, 3))
x = Lambda(vgg_preprocess, input_shape=(224, 224, 3), name='VGG_preprocess')(inputs)
preprocess_model= Model(inputs=inputs, outputs=x)
preprocess_model.summary()
# _________________________________________________________________
# Layer (type)                 Output Shape              Param #
# =================================================================
# input_1 (InputLayer)         (None, 224, 224, 3)       0
# _________________________________________________________________
# VGG_preprocess (Lambda)      (None, 224, 224, 3)       0
# =================================================================
# Total params: 0
# Trainable params: 0
# Non-trainable params: 0
# _________________________________________________________________
サンプルとして全画素値200の入力を用意
sample = np.zeros((1,224,224,3))
sample[:] = 200.0
print(sample)
# array([[[[200., 200., 200.],
#          [200., 200., 200.],
#          [200., 200., 200.],
#          ...,
出力を見てみる.
結果から前処理(RGB平均値を引く,RGB->BGR変換)が行われていることがわかる.
pred = model.predict(sample)
print(pred)
# array([[[[96.061, 83.221, 76.32 ],
#          [96.061, 83.221, 76.32 ],
#          [96.061, 83.221, 76.32 ],
#          ...,
これでpreprocessをネットワーク内で行うモデルを作成できた.
自作generator内では前処理をする必要がなくなり,GPUパワーで前処理を行うことで高速化が図れる.(本当にGPUで処理されているかは謎)
次にVGG16の特徴抽出部分を用意する.
(冒頭で自分で用意したvgg16を使うと書いたが,ここでは簡略化のためkeras.applications.vgg16を使用する.)
finetuneなのでinclude_top=Falseで,上記モデルの出力を入力するのでinput_shape=preprocess_model.output_shape[1:]としておく.
v
from keras.applications.vgg16 import VGG16
vgg16 = VGG16(include_top=False, weights='imagenet', input_tensor=None, input_shape=preprocess_model.output_shape[1:])
vgg16.summary()
# _________________________________________________________________
# Layer (type)                 Output Shape              Param #
# =================================================================
# input_18 (InputLayer)        (None, 224, 224, 3)       0
# _________________________________________________________________
# block1_conv1 (Conv2D)        (None, 224, 224, 64)      1792
# _________________________________________________________________
# ...
# _________________________________________________________________
# block5_conv3 (Conv2D)        (None, 14, 14, 512)       2359808
# _________________________________________________________________
# block5_pool (MaxPooling2D)   (None, 7, 7, 512)         0
# =================================================================
最後にFC層モデルを用意する.
同じようにshape=vgg16.output_shape[1:].
inputs = Input(shape=vgg16.output_shape[1:])
x = Flatten(name='flatten')(inputs)
x = Dense(4096, activation='relu', name='FC1')(x)
x = Dense(4096, activation='relu', name='FC2')(x)
x = Dense(30, activation='softmax', name='predictions')(x)
top_model = Model(inputs=inputs, outputs=x, name='top_model')
top_model.summary()
# _________________________________________________________________
# Layer (type)                 Output Shape              Param #
# =================================================================
# input_19 (InputLayer)        (None, 7, 7, 512)         0
# _________________________________________________________________
# flatten (Flatten)            (None, 25088)             0
# _________________________________________________________________
# FC1 (Dense)                  (None, 4096)              102764544
# _________________________________________________________________
# FC2 (Dense)                  (None, 4096)              16781312
# _________________________________________________________________
# predictions (Dense)          (None, 30)                122910
# =================================================================
上記3モデル(前処理モデル,VGG16モデル,FC層モデル)を1つのモデルに結合し,前処理をネットワーク内で行うVGG16が構築された.
model = Model(inputs=preprocess_model.input, outputs=top_model(vgg16(preprocess_model.output)))
model.summary()
# _________________________________________________________________
# Layer (type)                 Output Shape              Param #
# =================================================================
# input_16 (InputLayer)        (None, 224, 224, 3)       0
# _________________________________________________________________
# VGG_preprocess (Lambda)      (None, 224, 224, 3)       0
# _________________________________________________________________
# vgg16 (Model)                (None, 7, 7, 512)         14714688
# _________________________________________________________________
# top_model (Model)            (None, 30)                119668766
# =================================================================
# Total params: 134,383,454
# Trainable params: 134,383,454
# Non-trainable params: 0
# _________________________________________________________________
終わりに
学習において学習自体ではなく,データ用意の部分がボトルネックになっていることはなかなかつらい.そのため高速化ができてとても満足している.